
You’ve probably heard gardeners use the term “black gold” when referring to compost, and there’s a good reason for that. Compost packs a powerful punch of nutrients and beneficial microbes that makes plant life thrive. It makes lawns greener, vegetables grow bigger, and plants more pest-resistant, all without the use of chemical fertilizers.
Some studies have shown that compost can even improve the nutritional value and flavor of vegetables.
Composting can be done one of three ways: in a heap on the ground, in a bin, or in a tumbler. Which method you use will depend on your budget, the amount of space you have, how much you plan to compost, and how much manual labor you want to put in.
Composting 101 Basics
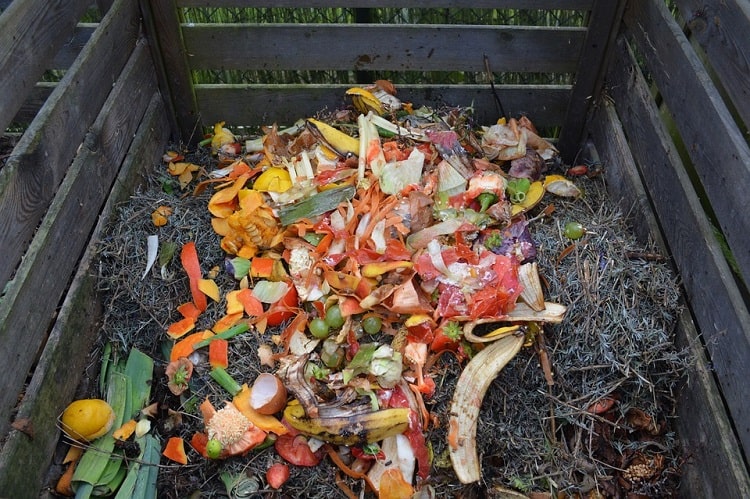
So what exactly is compost? Although it looks just like soil or fertilizer, it’s actually neither. Compost is merely decomposed organic matter. Think of it as a soil amendment to add to existing soil. All compost heaps require nitrogen and carbon in order to break down into rich, crumbly, “black gold.” Nitrogen is a green material, like grass and food waste, whereas carbon is brown material, such as twigs and leaves.
Nitrogen and carbon are added in alternating, 4 to 6-inch thick layers. Begin with the brown material and add the green material on top. Lightly water each layer as you go, making sure it feels firm, but not packed tightly.
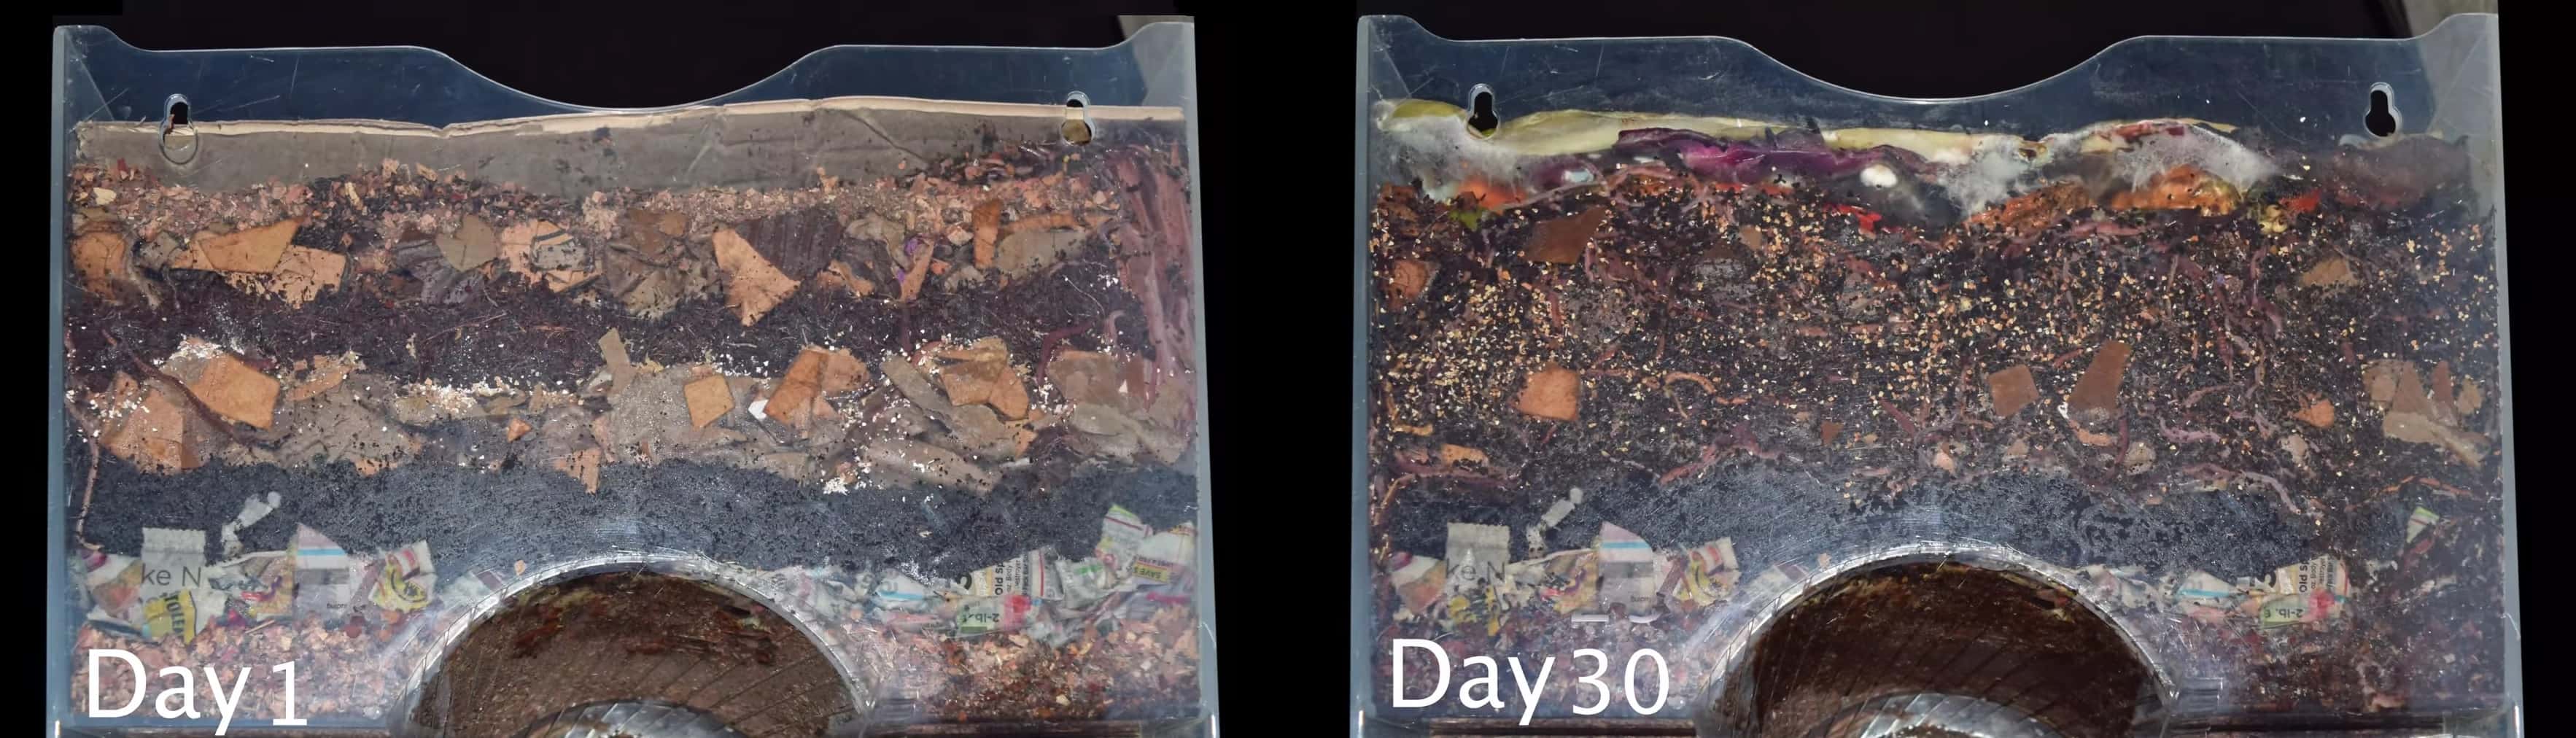
Notice, in the video, food and kitchen scraps are continually added to the top at regular intervals. This ensures the worms always have fresh food to eat. Vermicomposting is one of many forms of composting, so even if you have a phobia of worms, you can still make compost through other means.
Nitrogen/Green Material:
- Plant prunings
- Weeds
- Grass clippings
- Fruit and vegetable scraps
- Seaweed
- Egg, clam, or crab shells
- Coffee or tea grounds
- Non-carnivorous animal manure – horse, chicken, rabbit, cow, sheep
Carbon/Brown Material:
- Dry leaves
- Twigs
- Pinecones
- Straw
- Corrugated cardboard
- Clean paper
- Coffee filters
- Corn stalks
- Clean sawdust
Some materials can be hazardous in a compost heap. Here’s a list of items you should never add:
- Meat, dairy, fat, oil
- Bones of any kind
- Processed food
- Carnivorous animal manure or human waste
- Diseased plants or weeds that have seeded
- Charcoal or coal ash
Make a Compost Heap
The cheapest, simplest way to compost is to make a compost heap directly on your land. This is ideal for people with plenty of backyard space, although it requires a little elbow grease to maintain. If you’re worried about how a big heap of decomposing materials might look in your yard, you can just plant tall flowers or install fencing around the heap to conceal it.
Pick a level spot on bare ground with good drainage that is covered partially by sun and partially by shade. Avoid asphalt or concrete, since the drainage is nonexistent. It’s best to make sure the location is not easily accessed by animals, since they will rummage through the heap looking for scraps.
Step one, as mentioned above, is to mix brown and green materials in alternating layers until you have a heap that’s at least three feet high by three feet wide. You can make it up to five feet high and wide, but know that it will take longer to decompose.
Step two is to aerate the heap by turning it with a pitchfork or shovel once every two to four weeks. This ensures that the compost gets plenty of oxygen so it can decompose.
When turning the heap, be sure to bring the exterior part of the heap into the interior, so that all the material is broken down evenly. It’s normal to see steam coming off the heap after the first few turnings. Monitor the temperature with a compost or meat thermometer.
A range of 130 to 140 degrees Fahrenheit is ideal. You can expect to see results in anywhere from four to six months, depending on the time of year.
Remember that the compost heap should be moist, not wet. If it feels like a wrung-out sponge to the touch, it’s perfect. If it starts to get wet, you can either add more brown materials to absorb the excess moisture, or turn it more often to encourage aeration and decomposition.
When you’re finished turning the compost heap, you can cover it with a plastic tarp. This will help it retain heat and moisture, and act as a protective barrier against rain.
Build or Buy a Compost Bin
Compost bins are stationary containers that are set directly on the ground or have a metal frame holding the bin itself. Many of them have open bottoms to allow for aeration, making the decomposition process much speedier compared to a compost heap. A list of the best compost bins can be found here.
Bins are nice options for those who want to neatly contain their compost, keep it safe from pests, minimize odors, and make compost quickly. One drawback of using bins, however, is that it can be tricky to get a pitchfork inside to turn the compost.
There are myriad compost bin designs to choose from online. But if you’re on a shoestring budget or simply enjoy a DIY project, you can always design your own compost bin using a wide variety of materials. Examples include:
- Wood pallet and wire mesh
- Trash can with the bottom cut out
- Wine barrel
- Stacked cinder blocks
- Large plastic storage bin
Invest in a Compost Tumbler
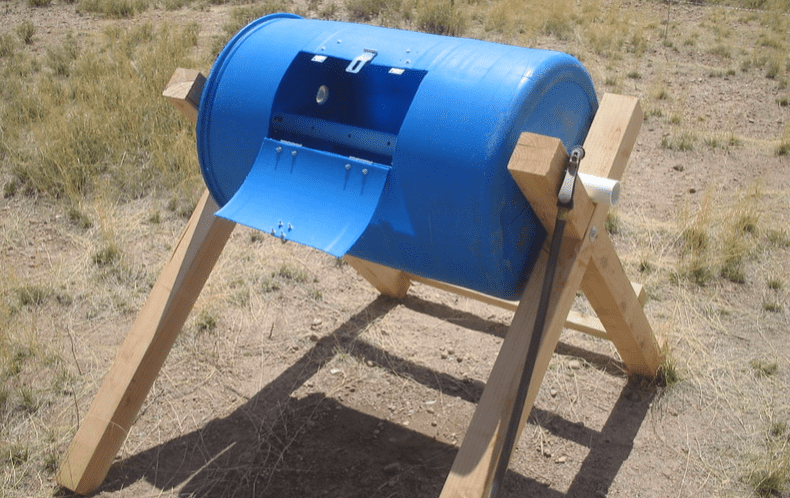
A compost tumbler is simply a rotatable bin that “tumbles” the compost inside it. Although tumblers are pricier than bins, they boast a number of benefits.
The biggest advantage is the ability to turn the compost quickly and easily, without the use of a pitchfork or shovel. This makes it the fastest and most efficient form of composting. Gardeners can get finished compost in as little as four to eight weeks.
Commercial compost tumblers come in horizontal, which are the most common, and vertical styles. Typically, they’re mounted on top of metal stands and have a latched opening on the side. Horizontal tumblers are outfitted with hand cranks to make rotating easier, as well as vents to allow fresh air in to aid the composting process.
Single Batch Tumbler
Most compost tumblers are single-batch, meaning they have just one chamber inside. Once the compost is placed inside the chamber, you have to wait until it’s finished to add more compost. If you have fresh compost that you’re waiting to add while the old compost matures, you can store it in a separate bin.
Double Batch Tumbler
A double-batch system is what turns an ordinary tumbler into a compost-producing powerhouse. With one chamber for composting old material and a second chamber for adding new compost, gardeners can eliminate the waiting period completely. This makes composting much easier for avid gardeners, and those who have a lot of kitchen waste to recycle.
New models of double batch tumblers have separate doors for each chamber. This is helpful because you can turn the tumbler over and empty out the contents of one chamber while keeping the other one secured.
Bokashi Composting
Bokashi composting is a form of anaerobic composting. If it’s been a while since your last science class, ‘anaerobic’ means without oxygen. On the other hand, ‘aerobic’ means it requires oxygen, like all of the other methods that have been mentioned above.
A bokashi method is a form of composting that does not rely on oxygen, but rather an inoculated bran that ferments all your kitchen scraps. Even the ones you can’t put into a regular compost pile!
The process isn’t difficult, as you fill a bucket, pail, or some type of air-tight container full of your kitchen scraps, add the special bran and then seal it shut. Over the course of almost two weeks, the mixture ferments, and a liquid byproduct, called leachate, forms at the bottom of the pail.
This leachate also called ‘compost tea’, is full of rich nutrients and can be sprinkled all over your garden. Because this liquid is so valuable, some specialized bokashi composters have a spigot built in for easy access and storage of the leachate.
After ten to fourteen days, the container can be reopened. The mixture is still somewhat recognizable but is still going through the decomposition process. This pre-compost is then buried in an unused part of the garden or soil to put nutrients back for the next seeds.

